Thursday, July 15, 2010

Claypot Chicken Rice @ Rice Cooker Chicken Rice

My sister had a craving for something Malaysian today, in particular, she wanted the local favorite Claypot Chicken Rice. A must try if in Malaysia. This rice and chicken dish is cooked in a claypot, but since we didn't have one handy at home, i cooked it in the electric rice cooker. It does not alter the taste in any way, only that you don't quite get the crisp layer that gets stuck on the bottom of the claypot, which is THE BEST PART of the whole dish!

Of course I immediately said yes to her request as it is one of my favorites as well, and I also have a recipe close enough to the ones you find at the local hawkers in Malaysia. Have made it a couple of times before and simply love it! Recipe courtesy of a blog I follow at www.mykitchensnippets.com. She's this really super cooker, Malaysian settled in the States. Love her recipes!


Love America for all these details =P


Ingredients

For rice:
3 cups jasmine rice
4 cups chicken stock

For chicken:
1 pair each of chicken thighs and breasts, cut into medium size
10 shitake mushrooms, stems removed, washed and soaked in warm water
2 tbsp oyster sauce
2 tbsp light soy sauce
2 tbsp dark soy sauce
2 tbsp Chinese cooking wine
1 tbsp cornflour
1 tsp salt
1 tsp white pepper powder
1 tbsp brown sugar
1 tsp ginger, julienned
1 tbsp garlic, minced
Spring onion, chopped for garnishing

Method

1. In a clean bowl, marinade chicken with all ingredients except for mushrooms and spring onion for 30 minutes.
2. Heat oil in a wok over medium fire, add marinated chicken for 5 mins. Add mushrooms and continue cooking until chicken is cooked through. Turn off heat, set aside.
3. Wash rice and drain well. Cook rice with 4 cups of chicken stock, open lid after 5 to 8 minutes (at this point, there'll be holes on top of rice) and spread cooked chicken on top of rice. Put lid back on cooker and allow to cook completely. Do not open lid immediately, allow to steam for about 10minutes.
6. Finally stir well, and garnish with spring onions. ENJOY!!
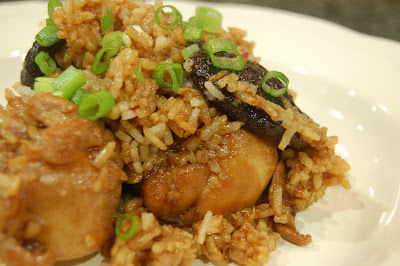
BON APPETIT =)

Blueberry Cinnamon Cookies

We had a little punnet of blueberries stashed in the freezer and having already made lots of cakes out of them, I wanted to try out cookies instead. Adapted a recipe, Raisin Cookies, from my "Guru" site, www.joyofbaking.com and replaced the raisins with blueberries instead and increased the baking time by 10 mins.
Other than the parts where the berries were tucked at were a little smushy, the cookies turned out pretty crisp and good.

Although the parts where the berries were tucked at were a little smushy, the cookies turned out pretty crisp and good. Loved how the juices from the blueberries were infused into the cookie from the heat, giving it a sweet, sour and "cinnamony" flavor! They were our after dinner snacks =P


Ingredients
Recipe yields about 4 dozen small / 2 dozen big

260g plain flour
2 tsp baking powder
1/8 tsp salt
1/2 tsp ground cinnamon
210g brown sugar
170g unsalted butter, room temperature
1 egg
1 tsp vanilla extract
60ml milk
1 cup frozen blueberries

Method

1. Preheat oven to 175C, prepare baking pans with parchment paper or non stick baking spray.
2. On low speed, beat together flour, baking powder, salt and cinnamon till mixed well.
3. Now add in brown sugar, butter, egg, vanilla and milk. Beat for about 1 minute.
4. Gently fold blueberries into the cookie dough with a spatula.
5. Using a small or regular ice cream scoop or 2 spoons, drop cookie dough on baking sheet, spacing them about 2 inches apart. Bake cookies for about 20 minutes, or till tops are light brown.
6. Remove from oven, allow to cool before biting into them =)

Spaced about 2 inches apart

Nicely expanded during baking (note how the juice of the berries have flowed out! YUM)

My lil nephew dunked 'em cookies in a cup of cold milk, looked so good I had them the same way, YUM! =P

Tuesday, July 13, 2010

Yummy Fried Rice

Did you know that fried rice was actually invented to make use of leftover cold rice?? I'm not quite sure how true this is but if you do some leftover rice from last nights dinner in your fridge, here is a very quick and simple but yummy fried rice. Just one of those days when all you want to have is something simple that won't take much of your time preparing and cooking. Ingredients for this recipe are most likely stuff that we have in our kitchens already.


Ingredients

3 cups white rice, cooked and *cold
2 eggs, lightly beaten
1/2 chicken breast, finely chopped
1 piece of turkey/chicken bacon, chopped
1tbsp minced garlic
3tbsp chopped carrot
3tbsp chopped spring onion
2tbsp oyster sauce
1tsp thick soy sauce
dash of white pepper powder
1 small cube chicken bouillon or 1tsp chicken powder

Method

Heat about 4tbsp oil and quick fry egg, set aside. Reduce oil to 2 tbsp, add in garlic and fry till fragrant. Add chicken, bacon and carrot, tossing until chicken is half cooked. Add in oyster sauce, soy sauce, white pepper and chicken bouillon, tossing until chicken cooked through. (starting from this point, the process should take only 2 mins) Now add in cold rice, mixing till rice coated in sauce. Add fried egg to rice mixture and chop egg gently through rice and toss well. Turn off heat, sprinkle spring onion on top and ENJOY!!

*Never use hot rice for fried rice, chances are it'll get clumped and mushy =(

Simple things in life are, at most times, the best things in life =) IMHO that is.

Butter Prawns, my favorite style

I don't know about you guys, but butter prawns are, at most times, a must order dish for my family when dining at any Chinese restaurants. Although i have an allergy eating prawns, i cannot resist the buttery bits it's cooked with. AH! I love them!! Finally, i manage to get the best ever recipe from an aunt who cooks amazing Chinese dishes. Not quite the ones you get at Chinese restaurant, where the butter bits are yellow, but this is just as good or even better IMHO!

This recipe consists of an ingredient that is not commonly used at the restaurants and, errrrrr, not a very healthy ingredient either, Evaporated Milk. BUT, but cooking it here in America, has somehow made it seem not so bad which you will know why in the pictures below.

We had some guests over and promised them some Malaysian favorites, and of course, Butter Prawns was the main dish =)


Note the "Lowfat" label on the evaporated milk can =)


Ingredients

800g prawns of your choice, (i used fairly large ones) unpeeled, cleaned and trimmed
2tbsp cornflour
1tbsp soy sauce
1tbsp garlic, minced
3tbsp butter
1 can evaporated milk, 250ml
salt and white pepper to taste
1 red chilli, chopped
curry leaves, optional
1 egg yolk, optional

Method

1. In a big bowl, toss prawns in cornflour and soy sauce till well coated. Marinate for about 10 minutes.
2. Heat 1 cup of vegetable oil in a deep frying pan at medium high fire. Once oil is heated through, lower fire to medium low and fry prawns in batches for a little more than a minute each side. Do not over fry prawns as it will result in tough meat, and you will have to cook them again at the final part of this dish.
3. Once all prawns are fried, set aside. (or you can work work simultaneously on the next steps while frying the prawns)
4. Heat a wok over medium fire, add butter and garlic. Fry till fragrant and pour in evaporated milk.
5. Lower fire and allow liquid to simmer. Season with salt and white pepper. Keep stirring so liquid does not stick to the wok until liquid slowly becomes a very thick paste like consistency. This process will take a good 20 mins or so.
6. At this point, if using, move paste to side of pan and add in egg yolk. Break it up and mix it with paste.
7. Now add in fried prawns, chilli and if using, curry leaves. Keep tossing prawns till paste turns into granules and everything is coated evenly.
8. Turn off fire, serve hot, best eaten with white rice. BON APPETIT!

This dish was very well accepted and savoured to the very last bit!

Kara's Cupcakes

Ahh..I finally got my taste of Kara's Cupcakes. After reading about their great reviews online before i got to the States this time, i wondered how good their cupcakes really were, and the moment i knew they opened not 1 but 2 outlets just about 5 minutes from my sisters place, it made its way through my "MUST GO" list =P

I really liked the owner/founder, Kara Lind's production concept. Just as it says on her website (www.karascupcakes.com), "Because we continue baking throughout the day, we are proud to offer cupcakes that have been baked within hours, if not minutes, for your enjoyment." , true enough, we had to wait for a couple of minutes for a fresh batch of cuppies to come out from the back.
Tucked away in a little corner shop at Town & Country Village, Palo Alto

Real chic interior, straight to the point without any distractions

We tried a bunch of mini's. I tried the Sweet Vanilla with Vanilla icing, Vanilla with Coconut Icing and Chocolate Velvet. All cupcakes was perfectly moist and soft, which is a plus point although the icing was a tad too sweet to my liking. Somehow, the vanilla cakes had this after taste that i wasn't too keen about though. But the Chocolate Velvet is definitely a favorite =) We kinda got all excited with the cupcakes and I forgot to get pictures of the whole batch =P

The only Vanilla with Vanilla Icing cupcake that made it through the photo session!!

A must go again spot before going home, at least for the Chocolate Velvet cuppies!!

Monday, July 12, 2010

Long due entry..

st a little experimenting with my caking skills =) Birthday cake for that one very special man who's soooo in love with his Superbike.

Moist Chocolate Cake (his favorite) sculpted and covered in fondant

The Baker & The Biker =P

Could have been better IMHO. But nevertheless, cake was very well admired and enjoyed by all guests and most importantly the birthday boy =) Who didn't quite have the heart to cut his cake!

Wednesday, July 07, 2010

Thai Basil Chicken..with a little difference

One of my favorite chicken dish, never fail to order whenever we're at any Thai restaurant. And I never knew it was this easy to cook before catching this one show on AFC, and I knew this dish would taste great just from the way this lady was cooking it. This dish is a common everyday dish in the Thai household. Eaten with white rice, just YUM!

Can you believe it..we couldn't find red chilli's anywhere yesterday! We went to like 4 supermarkets and nope..no luck! Not even at the fresh local produce market! As red chilli is one of the 2 key ingredient to this dish, the end product was a little bit off the color but tasted just as good. Had to do with just the green chilli's and 2 little "cili padi" (birds eye chilli) for an extra heat factor. Traditionally a mortar and pestle is used to prepare the 1st part of this dish, where we have to pound the chilli and garlic together. But my sis doesn't have one =( so i had to make do with her food processor which worked just fine.

I also added fresh Shitake mushrooms (couldn't resist them at the fresh produce market, they looked amazingly enormous and delicious!) and yellow zucchini just to jazz it up a little (i thought the yellow could make up to the red). I think the mushrooms added great flavor to the sauce.

Thai Basil Chicken

Ingredients

2 chicken breasts, cleaned and cut into bite size chunks
5 large shitake mushrooms, soaked and cut into 4's
1 yellow zuchini, thinly sliced
2-3 red chilli (green otherwise), chopped roughly
2 little pieces of cili padi (birds eye chilli)
6 garlic cloves
Handful of fresh sweet basil leaves
2tbsp oyster sauce
1tbsp soy sauce
A dash of fish sauce
Salt and white pepper to taste
Lil bit of chicken stock for sauce

Method

In a mortar and pestle, roughly pound chilli's and garlic (or whiz it up for about 5 seconds in a food processor). Heat oil in a wok, add pounded chilli and garlic, stirring continuously, for a minute. Now add chicken and keep tossing until chicken is almost cooked. Add mushrooms and zucchini, stir for 1 minute and add in rest of the ingredients except for stock and basil leaves. Stir until chicken well cooked, and pour in as much *stock as wanted. Turn off heat, add in **basil leaves, stir just a bit and serve with white rice. BON APPETIT!

*This is generally a semi dry dish, how much stock needed is totally up to your liking depending on how saucy you'd like your dish to be.
**It is very important to add basil leaves ONLY AFTER THE FIRE IS TURNED OFF, as it will blacken and taste bitter if cooked.


Apparently this dish should also be accompanied with a fried egg to balance the heat of the chilli's. But we were fine without it =) A must try for Thai food lovers!