Friday, March 12, 2010

Ricotta Cream Cheesecake

I've been wanting to bake a cheesecake for a long time now and have been just putting it off for no valid reason. So a few days ago I stacked up my fridge with 4 packets of Philly cream cheese and decided to bake 'em up yesterday using my favorite, the very easy Kraft Classic Cheesecake recipe. Took them out of the fridge to thaw and realized I only had 3 packets left! Then I realized I had whipped up 1 packet for a carrot cake order over the weekend. Ahh..there goes another 'put of' for cheesecake baking. As I reopened my fridge to put them back inside, I noticed a 250g tub of ricotta. Oh was I happy as I just love ricotta!!

Ricotta, as I had just discovered, is "technically" not a CHEESE cheese, it is a WHEY cheese. And whey cheese, is apparently not made from milk as regular cheeses are but made from the leftovers from cheesemaking! Interesting.....

Replacing the 1 packet of Philly cream cheese with the ricotta, I knew I was going to end up with a luscious cheesecake. Since it was going to be "luscious", I wanted to luxuriate the cake a little more by adding 3/4 cup of heavy cream and almond meal to the biscuit base. I was very happy with my additions! And not to forget my final touches, I spread fresh whipped cream over the chilled cake and topped with gooseberries and blueberries.


Ingredients
*adapted from http://www.kraftrecipes.com/recipes/philadelphia-classic-cheesecake-52544.aspx and jazzed up by me!

For the cake:

3 packets of Kraft Philly Cream Cheese
1 250g tub of Ricotta cheese
1 cup of caster sugar
4 eggs
1 tsp pure vanilla extract
3/4 cup heavy cream

For the base:

1 1/2 cup crushed Digestive biscuits
1/2 cup almond meal
2-3 tbsp butter, melted
2 tbsp caster sugar

Method

1. Preheat oven to 175c (165c if using dark springform pan which I did).
2. Base: Mix crumbs, almond meal, butter and sugar together. Pour and press onto bottom of springform pan and 1 inch up the sides. Bake in oven for about 5 minutes just to let it set.
3. Cake: Cream the cheese's, sugar and vanilla with an electric mixer until well blended.
4. Add eggs, one at a time on low speed. Beat until just blended.
5. Add in cream, beat for 10 seconds.
6. Pour batter over prepared crust base, into the oven for about 50 to 55 minutes until center is almost set.
7. Immediately loosen cake from sides of pan using a spatula. Allow to cool completely, (you could, if you want, as the original recipe remove the rim of the pan at this point but I didn't just so it was easier for me to cover the cake with cling wrap), cover with cling wrap and refrigerate for 4 hours or better still overnight.
8. Now top 'em up with your topping of choice from chocolate sauce or whipping cream and BON APPETIT!!

And did I mention what a smooth and creamy and LUSCIOUS and very vanilla ice cream like this cheesecake was??? It was a big hit at home and that makes me a very happy baker today =) XO
Tuesday, March 09, 2010

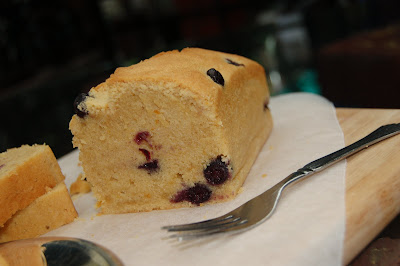
Blueberry Sour Cream Loaf Cake

As I was clearing my fridge today, I realized I had some blueberries leftover from one of my orders from the weekend. Of course, you have to bake with them! So after going through some blueberry recipes, I came across Blueberry Yogurt Loaf. I didn't have any yogurt in hand, but had a container of sour cream, hence the title Blueberry Sour Cream Loaf Cake =)


Based on my experiences, it does not really make that much of a difference switching from yogurt to sour cream, as they both have somewhat almost same qualities and taste. Basic difference is yogurt is made from fermenting milk and sour cream is from fermenting cream (obviously yogurt is the healthier choice). But one thing is for sure, both ingredients result a smooth smooth finish to cakes, kind of a melt in the mouth effect. And whoever thought that the final produce is going to taste sour using them (like me!), NO it won't!

Original recipe also calls for lemon zest, but I somehow thought that orange zest will add a sweeter note to the cake while balancing the tartness of the blueberries.


Fresh out of the oven. I'm glad I popped in those extra berries on top of the batter, love the Dalmation effect!

Ingredients

150g butter, room temperature
1 cup brown sugar
Zest of 1 orange
2 eggs
1 1/4 cup plain flour
1/2 cup self raising flour
Pinch of salt
3/4 cup sour cream (or yogurt)
3/4 to 1 cup blueberries (fresh/frozen), keep aside 10 berries
2 tbsp milk

Method

1. Preheat oven to 170c. Grease and line with parchment 1 regular loaf pan or 2 small loaf pans. Allow parchment to extend out of loaf pan wider sides for easy removal of cake once baked.
2. In an electric mixer, cream butter, sugar and zest until light and fluffy. Meanwhile sift dry ingredients.
3. Add in eggs and beat till just incorporated.
4. Turn off mixer, now stir in sifted flour and sour cream in 2 alternate batches. Stir in milk if batter to thick.
5. Now fold in blueberries gently.
6. Pour batter into prepared pans. Smooth top and lightly press the remaining berries on batter surface (just so it looks pretty!)
7. Into the oven for about 1 hour and 30 minutes if using regular loaf pan or 1 hour for smaller pans. Let cool in pan and gently lift cake out with the support of parchment. BON APPETIT!

Note from original recipe: Cake surface will crack! But it's not an ugly crack as you can see =)

Thursday, March 04, 2010

Chocolate Chip Cookies

Now here is something I love..chocolate chip cookies. But store bought ones..they somehow just don't make me all that happy!! The packeted ones are usually be all too crunchy or the cafe ones are unfreshly soft. I always wished they could come in a certain texture, not too crunchy at the same time not to soft. Firm but still melts in your mouth. And there came my quest for the search of the perfect chocolate chip cookie that WOULD make me happy =) So what do we do......??


YES! We hunt high and low for that particular recipe and if we're still unable to attain the "right crunch" satisfaction, we come up with our own version. And so I did, after several attempts of a bit of this and a bit of that..my dream chocolate chip cookie became was developed! Here it is, my very easy and quick chocolate chip cookie recipe. For this particular session, I've not only incorporated the usual chocolate chips, but also chocolate chunks and coffee chocolate chips.


Simple ingredients needed for this simple yet yummy cookies.

Ingredients
*makes 12 perfectly sized cookies if followed my ice cream scoop method

130g plain flour
45g good quality cocoa powder
1/2tsp baking powder
Pinch of salt
130g brown sugar
120g unsalted butter, room temperature
1 egg
1tsp vanilla extract
1 to 1 1/2 cup chocolate chip

Method

1. Preheat oven to 175c. Line baking pans with parchment paper.
2. In a bowl, sift together flour, cocoa, baking powder and salt. Keep aside.
3. Cream butter and sugar with electric mixer until light and fluffy.
4. Add in egg and vanilla. Beat until mixture just incorporated.
5. Add in sifted flour and beat until just incorporated.
6. Stir in chocolate chips.
7. Scoop cookie batter with a small ice cream scoop and place on a prepared pan. Make sure to space them about 2 inches apart as they'll expand during baking.
8. Bake for about 10 minutes for a soft center cookie or 18 minutes for a solid but not too crunchy texture.
9. Allow to cool completely and BON APPETIT!
*keeps well in an airtight container for about 2 to 3 days


Note the spacing between the scooped cookie batter, I've only placed 4 scoops in a pan.


Wednesday, March 03, 2010

A sweet beginning in the form of a Plum Frangipane Tart

I have always wanted to bake with plums although I don't enjoy them! But everyone else at home loves 'em and besides, plums do bake very well, and they're equal substitutes to peaches and apricots. They can be really tart or really sweet, and from my experience, that really depends on where it's been cultivated. I think the Australian ones are sweet enough. Oh and plums are an amazing source of dietary fiber to the human body!

On a trip to the market with mom yesterday, our regular fruit stall had heaps of plums with a tag that read "Sweet & Juicy Australian Plums", they were medium sized, nice and firm and I came home with a bag full of 'em =) While paying I already knew just what was I going to bake up with them! A plum frangipane tart. Frangipane is an almond cream/filling which when baked becomes a golden cushion that encases a warm nutty texture and yumminess!!


This almond filling recipe is adapted from my French Pastry class and modified to my style and the short crust pastry recipe is my own after many many trial and error sessions!

Ingredients

For the Tart Base
Short Crust Pastry - Pate Brisee (my own recipe)
*recipe is just nice for a 7inch pie/tart pan

1 1/2 cups plain flour
113g butter, very cold and cubed
2tbsp caster sugar
1 pinch of salt
1/2 egg + 1/2tsp vanilla extract, lightly beaten (optional, it makes the pastry a little less crumbly)
2 to 3tbsp cold water

Method

1. Combine all ingredients except for the cold water and egg in a big bowl and start to rub the butter between your thumb and fingers into the flour until mixture crumbles resembling a course meal with pea sized butter bits. This process should be done in less than 5 minutes, making sure that the butter doesn't melt in the warmth of your hands.
2. At this point, drizzle a 1 - 2tbsp cold water and knead lightly until dough comes together. If mixture is still crumbly, drizzle in another tbsp of cold water. Stop kneading, do not knead for more than 30 seconds. (if using egg, drizzle in before cold water).
3. Bring dough together, wrap in cling film and into the fridge for at least an hour.
4. After an hour (at this point, preheat your oven to 180c), take dough out of fridge, thaw for about 5 minutes. Roll dough (I roll them between cling wraps which I strongly suggest as it prevents cracking, sticking to the surface and the rolling pin) as thin or thick as desired while making sure it is the right size of a removable bottom tart/pie pan. Transfer into your pan, lightly press into sides and dork pastry with a fork.
5. Blind bake (baking without any filling) for about 5 minutes. Take out of oven and let cool slightly.
*(step 1 - 2 can be prepared in the food processor as well)

For the filling

60g butter, room temperature
60g caster sugar
1/2 egg, lightly beaten
1/4tsp vanilla extract
80g almond meal
1tbsp plain flour
1 sweet and firm plum, pitted and sliced (or peaches/apricots)

Method

1. With an electric beater, cream butter and sugar until creamy and fluffy.
2. Add in egg and vanilla, stir with a wooden spoon or spatula until combined.
3. Stir in almond meal and flour until mixture is nicely combined.
4. Evenly spread almond filling into the blind baked pastry shell making sure there are no empty spot. Arrange sliced plums ringing around the almond filling.
5. Into the oven of 180c and bake for about 25 mins or until the filling and pastry is golden brown.
6. Allow to cool, remove the ring of your pan, slice and BON APPETIT!


This is really a hassle free and a mishap free recipe, you couldn't possibly go wrong with it!


Although, as I've mentioned earlier, I don't fancy plums..but this is my idea of a perfect tea time delight =)

My culinary journey on to the next level...

Hello everyone,

I'm going to start my introduction with my mother, she is the stem of my passion for cooking. She is by far the best cook that I have ever known! My ever growing interest in cooking definitely started from, 1st, eating the delicious food she prepares for us and then from watching her cook hearty meals. And it's moms rule that we would never have catered food for any occasions at home. Our friends would actually self invite themselves over just to have moms meals =) She never fails to impress us..on a daily basis I must say, dishing up such yummy food! She does not even note down anything while watching cooking programs on TV but the next thing you know, that's what we will be having for lunch or dinner the very next day! I am no where near her skills in the kitchen, but am striving to get there!! So this blog, is somehow, a dedication to my mother for all those wonderful, or I'd rather say SCRUMPTIOUS moments she's filled our hungry tummies =) *and she still does!!

I've learned a lot from my mother and am still learning until today. And did I mention that I work in one of the world's biggest award winning Indian restaurant? Yes I do =) My father is the founder and owner of our ethnic and beautiful restaurant, Passage Thru India.

So here I am right now, at the "almost at the end of the *novice* stage" in my culinary journey. Dare I say that? Maybe. Does the above mentioned factors makes me a natural in the kitchen? The humble part of me says not really, it's all been a learning process (very truthfully, I have dished some rather nasty tasting dishes! And my 1st ever baking experience was UTTER DISASTER!) and I've just been lucky to be amongst some really great cooks. And how can I not mention how I have always been and am very very VERY inspired by rest of the online cooking and baking journals.

I have not attended any professional cooking classes, all my training comes from my mother and our Executive Chef at the restaurant, TV cooking shows, foodie blogs, magazines and books. I bake too, apart from my work at the restaurant, from what I started out as a disastrous hobby became my little business of home made sweet treats called "Cupcake Factory". As the name suggests, I specialize in cupcakes, but the menu goes on further from just cupcakes to a variety of whole cakes, wedding cakes, pies and tarts, mini desserts and savory finger foods. My little bakery is at my dad's restaurant where I have the privilege of using their industrial sized oven to bake as many as 100 cupcakes at a time, which has been very very helpful to me whenever I get big orders. I cater to all sorts of parties and events. And as business grew, I had the desire to expand and improve my very little knowledge of pastries and attended a Professional French Patisserie Program conducted by a Master Pastry Chef, Chef Karam.

As far as I'm concerned, and I'm pretty sure almost all of us think alike, freshness of each and every drop of ingredient is THE KEY to any successful cooking and baking session. Let it be even salt! I love cooking and baking with the freshest and good quality ingredients that I could lay my hands on.

And beyond all that, something my mom always says "Infuse your preparations with passion and care because nothing beats a hearty meal or even a little cupcake thats cooked or baked with LOVE!"

So here it is, a journal of my humble attempts to share my love for cooking and baking.

Thank you for stopping by, hope you enjoy my blog =)

XOXO